Warning
You are reading an old version of this documentation. If you want up-to-date information, please have a look at 1.1 .2.1 Acquisition settings
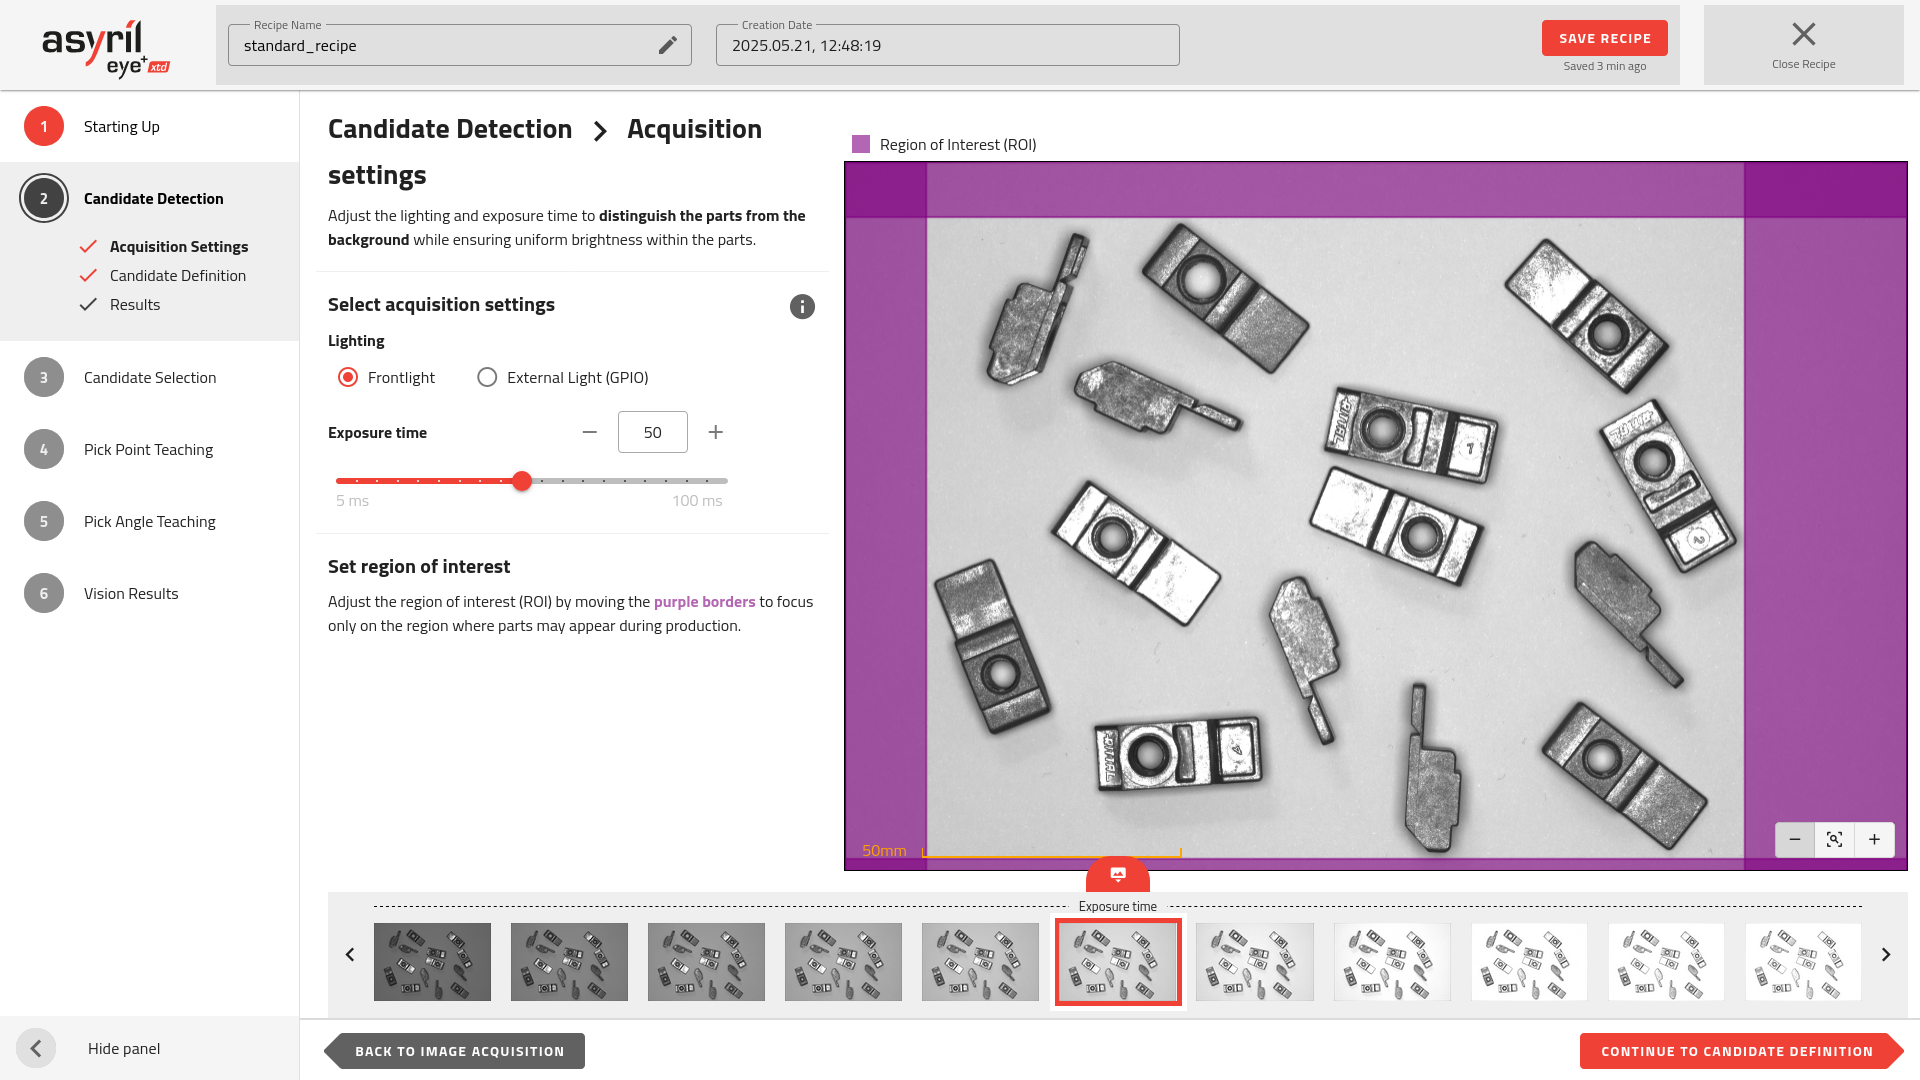
Fig. 58 Candidate Detection - Acquisition settings
The Acquisition Settings page allows you to configure the lighting and exposure settings to enhance part visibility and distinguish them from the background. This step is crucial for optimal candidate detection in the next steps of the wizard.
Select acquisition settings
Lighting
The type of lighting must be adapted to your parts and your environment. Choosing the appropriate lighting ensures optimal detection of parts while minimizing the visibility of undesired elements.
For effective part detection, the lighting should enhance the edges and contours of the parts, maximizing the contrast against the picking area. EYE+ XTD leverages an AI algorithm to identify and localize parts within the defined region.
Most steps allow you to configure the lighting type and settings to optimize the detection process according to your specific requirements. The default lighting configuration is Frontlight, which is available in most setups. Additionally, you can connect an External Light, which can be configured as a Backlight, Sidelight, or another type, depending on the application.
Frontlight (Default)
The Frontlight is the standard lighting option and is usually available. It is particularly effective for detecting surface features and edges, especially when the parts are opaque or slightly reflective.
Note
In highly reflective environments, frontlight may produce glare. To mitigate this, consider using a polarized filter to reduce reflections and improve detection rate and accuracy.
External Light (Optional)
If additional lighting is required, an External Light can be connected to your setup. This light source can be configured based on the needs of your application:
Backlight: Ideal for silhouette detection. This type of lighting emphasizes the outline of the parts, providing strong contrast against the background of the picking area. It is particularly effective for candidate detection as it highlights edges clearly.
Sidelight: Useful for accentuating surface textures or identifying edges on complex geometries. This option is suitable for parts with textured surfaces or layered components where shadows can enhance feature detection.
Note
If the lighting settings you want to use are not available on this page, you can easily change the acquisition lighting settings in the configuration window. Once you have changed these settings, you must go back to the 1.2 Image Acquisition page and click on the to take new images with the newly defined settings.

Fig. 59 Starting up - restart image acquisition
Exposure time
Exposure time is the time during which the camera is exposed to light when acquiring images. The longer the exposure time, the brighter the image.
Increasing or decreasing the exposure time affects the contrast between the parts and the production plate. You have to find the optimal exposure time for part detection.

Fig. 60 Images with different exposure times using frontlight
Common Issues
During the acquisition process, you may encounter issues with part visibility. Two common problems are:
Glare
This occurs when the lighting is too intense or reflects off shiny surfaces, causing bright spots that can obscure part details.
To solve this issue, reduce the exposure time, adjust the lighting angle if possible, or apply a matte finish to highly reflective parts.
Additionally, using a polarized filter on the camera lens can significantly reduce glare. A polarized filter works by blocking certain light waves that cause reflections, improving contrast and visibility of shiny parts.
For optimal results, the lighting source must also be equipped with a polarized filter, aligned with the camera’s filter. This combined setup, called cross-polarization, minimizes reflections more effectively than lens-only polarization.
Underexposure
This happens when the lighting is insufficient, resulting in dark images where part edges are not clearly visible.
To solve this issue, increase the exposure time gradually until the parts are well-defined and visible in the preview.
Overexposure
Overexposure occurs when the image is too bright, causing parts to lose definition and details to be “washed out.” This typically happens when the exposure time is too high or the lighting is overly intense.
To solve this issue: - Reduce the exposure time incrementally until parts become distinguishable with clear edges. - Dim the lighting source if adjustable, or reposition it to avoid direct reflections.
Tip
When fine-tuning exposure, aim for the parts to be well-lit but with visible contours and no white “clipping” in the image.
Set region of Interest
By default, the Region of Interest (ROI) used in the recipe is inherited from the vision calibration process. However, you can modify it to better fit your application and improve detection accuracy.
Adjusting the ROI allows you to define the specific area where EYE+ XTD will search for candidates. This is done by moving the virtual barriers (purple borders) in the image on the right to include only the relevant picking area.
To ensure reliable part detection and stable picking performance:
Match the ROI to the actual picking area used by the robot or gripper.
Exclude irrelevant zones, such as empty corners or conveyor edges, to avoid false detections.
A well-defined ROI reduces processing time and helps the algorithm focus only on useful visual information.